http://farm7.static.flickr.com/6087/6104893653_faabff01fd_z.jpg
I'm a huge music buff. I play the piano and have an ear that'll catch the softest of sounds that'll irritate the hell out of me if I don't fix it. So naturally I'm extremely fussy about my sound systems. Pair that with my love for cars, I thought it would only be appropriate that I do a DIY on how to install an in-car-sound system.
Note - I have not forgotten about the brake DIY and coolant DIY, it'll come a little later.
Before I started performance modifications, I was heavily involved in ICE (in car entertainment). At that time everyone and anyone was into ICE. Forums had thousands of discussion threads and hits would reach at least 100 to 200 per day. Those were the days! The 'scene' has since died down and you'd be hard pressed to find an active Malaysian ICE forum.
Anyhow, I'm still an avid ICE fan albeit not as hardcore. I thought it would be cool to resetup all my old gear into my Wira which I originally had intended to sell - due to unforseen circumstances the car remained in my possession until today. Unfortunately my JL subwoofer and Orion HCCA G4 amp was sold off so I'll be sourcing for replacements to DIY later so this DIY will not include a subwoofer install.
Also, this is a relatively long DIY so it'll be broken up into several chapters.
Warning : Difficulty level for this is highly dependant on the complexity of your car. For my Wira I give it a 5/10 difficulty level. So if you're not confident or have no idea how to remove bits and pieces of your car, pay a professional to do it for you.

Yes... that's the original tape deck player that came with the car. I have no idea how I survived with just this piece of junk for a whole year.

Tools/Equipment/whatnots needed :
1. Detailed user manual for your headunit (HU), amp and speakers. But since I'm familiar with my amp and speakers, I only used the HU manual.
2. Lots of heatshrink, female and male connectors and insulation tape.
3. Plier, cutter, phillips screw driver, test pen (or test light), ratchet to remove seat.
4. Lots of cable ties big and small.
5. Your HU, component speakers (consists of tweeters, mid-bass and crossovers), ICE battery fuse and holder.
6. Power cables (recommended 4ga), RCA cable, 14/16ga wire for remote and lots of 10/12/14ga speaker wires.

I've removed my HU dozens of times. I've had 4 different HUs in the past so removing the current panel was just unscrewing 2 screws just above the HU and one hidden screw where the ashtray is (remove the ashtray first). Then it was just a matter of gently yanking the front panel out.

Disconnect the wiring from the back of the HU which is the main socket and the antenna plug. It'll help to remove your cigarette lighter socket and whatever electronics you have there. In my case it was the starter button socket. Once done you'll be able to take the HU out of its bracket and completely out of the panel. Keep the bracket if your replacement HU doesn't have a bracket.

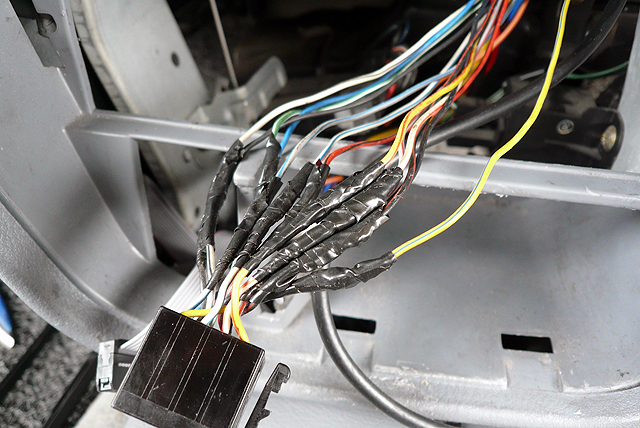
In my case since it was already modified, I had to unwrap the insulation tape on the main socket. For new cars or unmolested cars, this would just be a matter of cutting the desired wires. With the test light/pen you'll need to find out which wires are :
1. Live (to battery)
2. Ground
3. Ignition (also live but only when the key is turned to "on" position)
4. Illumination (turn on and off your headlamps and test which wire responds)
The rest I didn't touch. I'm not using my stock speaker wiring and my HU has a built in antenna booster so I don't need to connect the antenna wire from the stock wireloom to my new HU.

Your replacement HU should have a wire socket of its own. Using the manual, identify which wires are related to the earlier #1 to #4.

Once you have it connected, it'll look like this. Tidy up the wires not in use but don't tie up the "remote" wire for your new wire socket. You'll need to use that thin 14/16ga wire to connect the "remote" connection to your amp.
I used the female and male connectors to connect the wires. It's better than just twisting two bare wires together and I also used the heatshrink to hold the wires in place. Looks a lot more pro.
Important note - be EXTRA careful with the battery live wire. This is a live wire so unless you want to fry something, make sure you wrap it up with insulation tape if not in use.
To be continued in part #2
I'm a huge music buff. I play the piano and have an ear that'll catch the softest of sounds that'll irritate the hell out of me if I don't fix it. So naturally I'm extremely fussy about my sound systems. Pair that with my love for cars, I thought it would only be appropriate that I do a DIY on how to install an in-car-sound system.
Note - I have not forgotten about the brake DIY and coolant DIY, it'll come a little later.
Before I started performance modifications, I was heavily involved in ICE (in car entertainment). At that time everyone and anyone was into ICE. Forums had thousands of discussion threads and hits would reach at least 100 to 200 per day. Those were the days! The 'scene' has since died down and you'd be hard pressed to find an active Malaysian ICE forum.
Anyhow, I'm still an avid ICE fan albeit not as hardcore. I thought it would be cool to resetup all my old gear into my Wira which I originally had intended to sell - due to unforseen circumstances the car remained in my possession until today. Unfortunately my JL subwoofer and Orion HCCA G4 amp was sold off so I'll be sourcing for replacements to DIY later so this DIY will not include a subwoofer install.
Also, this is a relatively long DIY so it'll be broken up into several chapters.
Warning : Difficulty level for this is highly dependant on the complexity of your car. For my Wira I give it a 5/10 difficulty level. So if you're not confident or have no idea how to remove bits and pieces of your car, pay a professional to do it for you.

Yes... that's the original tape deck player that came with the car. I have no idea how I survived with just this piece of junk for a whole year.

Tools/Equipment/whatnots needed :
1. Detailed user manual for your headunit (HU), amp and speakers. But since I'm familiar with my amp and speakers, I only used the HU manual.
2. Lots of heatshrink, female and male connectors and insulation tape.
3. Plier, cutter, phillips screw driver, test pen (or test light), ratchet to remove seat.
4. Lots of cable ties big and small.
5. Your HU, component speakers (consists of tweeters, mid-bass and crossovers), ICE battery fuse and holder.
6. Power cables (recommended 4ga), RCA cable, 14/16ga wire for remote and lots of 10/12/14ga speaker wires.

I've removed my HU dozens of times. I've had 4 different HUs in the past so removing the current panel was just unscrewing 2 screws just above the HU and one hidden screw where the ashtray is (remove the ashtray first). Then it was just a matter of gently yanking the front panel out.

Disconnect the wiring from the back of the HU which is the main socket and the antenna plug. It'll help to remove your cigarette lighter socket and whatever electronics you have there. In my case it was the starter button socket. Once done you'll be able to take the HU out of its bracket and completely out of the panel. Keep the bracket if your replacement HU doesn't have a bracket.

In my case since it was already modified, I had to unwrap the insulation tape on the main socket. For new cars or unmolested cars, this would just be a matter of cutting the desired wires. With the test light/pen you'll need to find out which wires are :
1. Live (to battery)
2. Ground
3. Ignition (also live but only when the key is turned to "on" position)
4. Illumination (turn on and off your headlamps and test which wire responds)
The rest I didn't touch. I'm not using my stock speaker wiring and my HU has a built in antenna booster so I don't need to connect the antenna wire from the stock wireloom to my new HU.

Your replacement HU should have a wire socket of its own. Using the manual, identify which wires are related to the earlier #1 to #4.

Once you have it connected, it'll look like this. Tidy up the wires not in use but don't tie up the "remote" wire for your new wire socket. You'll need to use that thin 14/16ga wire to connect the "remote" connection to your amp.
I used the female and male connectors to connect the wires. It's better than just twisting two bare wires together and I also used the heatshrink to hold the wires in place. Looks a lot more pro.

Important note - be EXTRA careful with the battery live wire. This is a live wire so unless you want to fry something, make sure you wrap it up with insulation tape if not in use.
To be continued in part #2


