What r u guys talking about ? I dunno what is er6n and LC kot.....

me either hehehe...
okey...sudut mari mewarna. how to cabut ur headlite....
1. unscrew all bumper screws. my bumper had cabut before, so ilang most of the screws. left only 4 pcs screws. 2 is inside the tyre room cover....apa nama mende ni ntah. the other 2 is on the headlite (refer 1st picture for screws locations, red color arrows for bumper screws). after that, carefully cabut ur bumper...
2. like abang aja said, can cabut dah headlite oredi. but there had 2 screws behind "batang besar hitam" (refer 2nd picture). so i cabut the "batang besar hitam" dulu. to unscrews it, use 12" spanar. location shows on the 1st picture. (refer for yellow color arrows).
3. then can cabut headlite dah. headlite screws have 5pcs each side. 2 pcs at above the headlite, 2 pcs below and 1 pc at the side. (refer to green color arrows on the 1st picture)
4. after headlite had cabut, cabut also all bulbs attached to the headlite, except for hid bulb. really menyusahkan if u wan to cabut...better leave it like that. (please remember all the bulb location before cabut to make installation work easy after finish.
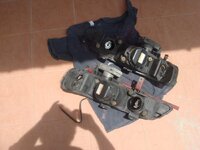
5. then, tanpa segan silu....jemur ur headlite under nice sunlite (refer picture 3) heheh.....or if u wanna cepat, use hair dryer, sembur inside the headlite.....mine jemur-ed for 3 hours heheh...(plus sleeping)
6. after jemur, using silicon. apply to the gap between headlite front cover and back cover around the headlite. This work need to be very carefull. dont apply on the top of the gap only, make sure the silicon masuk till dalam2...need to tekan kuat2 lah. u can see from front of the headlite either the silicon had masuk or not.
7. after applied the silicon, jemur again lah..(or use hair dryer).
8. about 1.5 hour after that, can pasang back the headlite lah. install back all bulb, then connect with lamp cables, then screws headlite back to car body. after that install "batang besar hitam", then bumper.
9. make sure all the cables had been connected to the bulbs. try start the engine and check all lamp...small lamp, hi-beam, signal etc...