

Hi All :wavey:
I'm gonna post my DIY brake shoe change on my Myvi. Most of us know that brake shoes last very long, almost the lifespan of the car in some cases. Therefore we do not see many people changing the brake shoe. However, because myvi brakes suck, I thought of getting a better brand, at least at my perspective.
Story: This is my first DIY brake shoe change. I have done disc brake pad replacement which is fairly simple and easy but not brake shoe replacement. Thus before I started I actually went through some websites and videos to enrich my knowledge and courage (brakes man..screw up and I might die:stupid:). Although with some knowledge on how to do it, I still did not have the courage to do so. Therefore after having deeper thoughts, I decided to let the mechanic to do it (my friend, more than 10 years experience) and I watch and learn.
So I went to him and told him that I would like to change the brake shoes. He told me that it will take 1-2 hours at least. He then asked his junior to do it since he is already a senior and he continue to work on the car he was on. After around 40 minutes the junior managed to replace the old shoes with new one, with a lot of brute force. I shall tell you why later. Everything seemed perfect but when he wanted to put the cover back, it didnt fit. So after another 30 minutes he gave up and asked my friend to have a look. They both troubleshot the problem but was fruitless. Seeing them encountering trouble, I asked the junior if the adjuster is adjusted correctly or not and he answered yes, it is at the minimum expand setting. Since my friend had also looked at it so I trusted them and didnt question further. In the end my friend said that the new brake shoes are not identical and it cannot fit. They put back the original shoes and everything was fine. My mind wasnt thinking right at that time and I also thought that what he claimed is true so I paid him 20 bucks and left.
Feeling disappointed and dissatisfied, the question why the brake shoes didnt fit kept playing in my mind because I believe that the dissimilar between the original and the new shoe will not cause this problem. So I took the tools out and start DIY-ing !
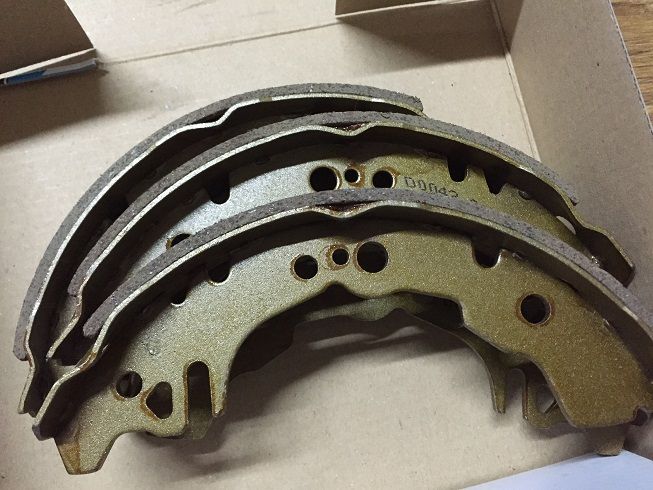
1. This is the new brake shoe that I bought. Bendix Standard Bonded Brake Shoe.

2. The new brake shoe looks like this
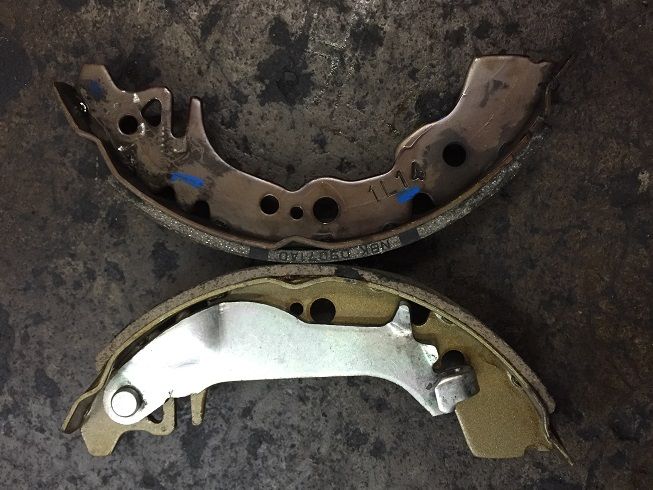
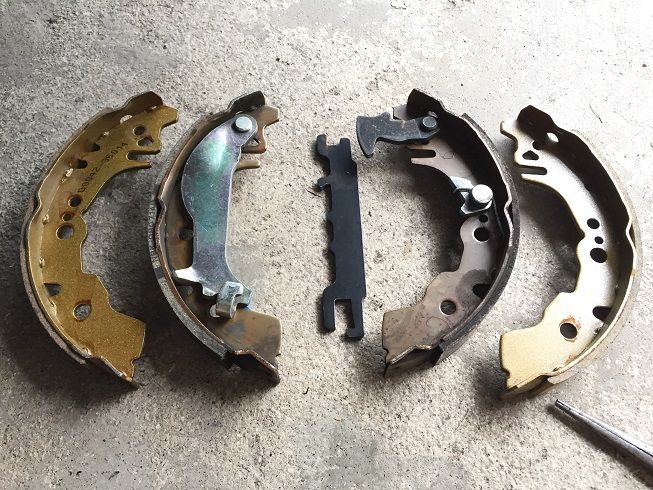
3. Side by side comparison. Not much differences can be seen here.
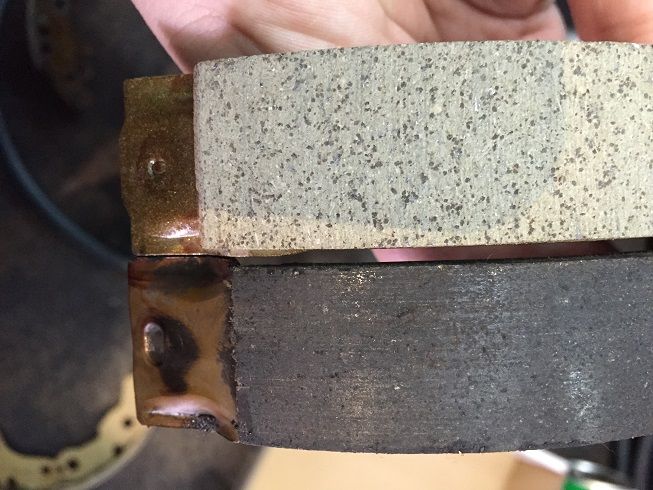
4. You can see it clearly in this picture what is the difference. The bendix friction pad is actually longer (at both ends) than the original. This could result in more bite. AND THIS IS THE REASON THE MECHANIC GAVE ON WHY THE COVER CANT BE CLOSED!
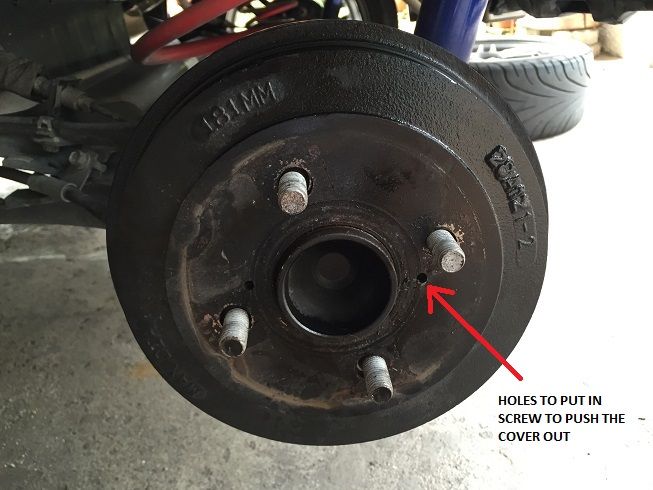
5. So lets start the fun part! Jack up the car, put jack stand to support the car, and remove the wheels. After that just give the drum some soft knocks with a hammer and mallet. If you still cannot remove it, just put two screws at the screw hole and push the cover out.
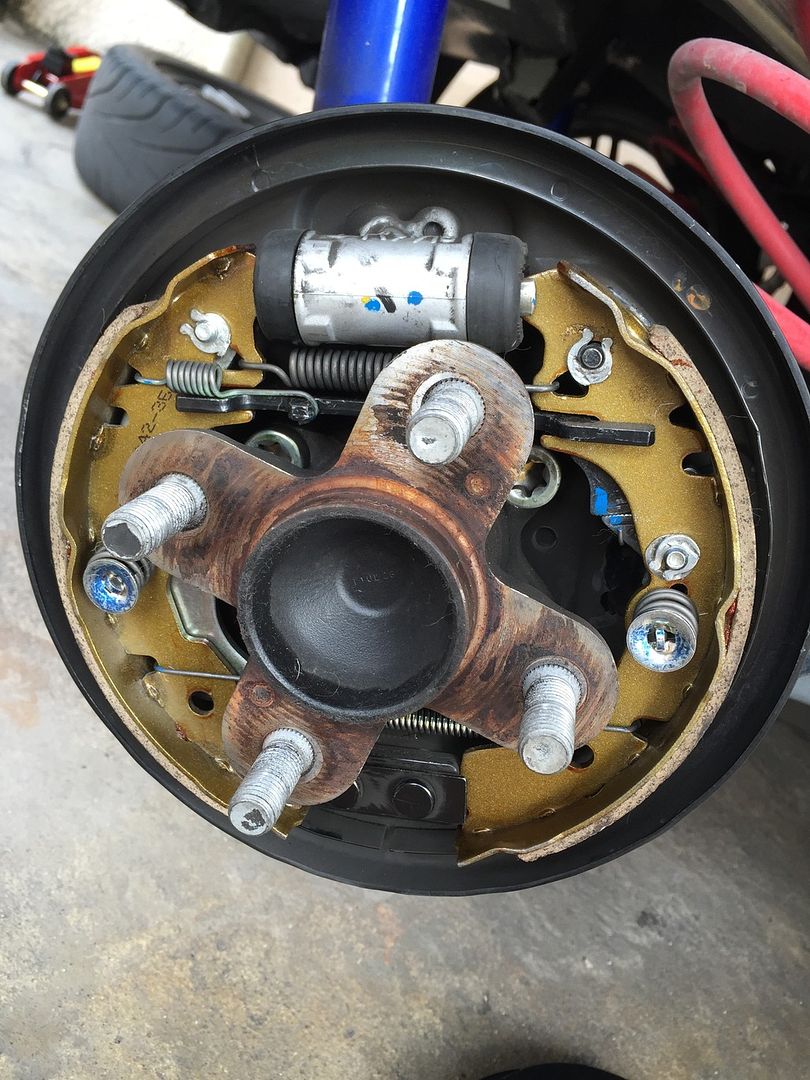
6. Before we start on dissembling stuffs, lets take some pictures so that we will not forget how it should be assembled. In this picture we can see the adjuster. All drum brakes of any car brand have this. It is to self adjust when the pads get thinner.

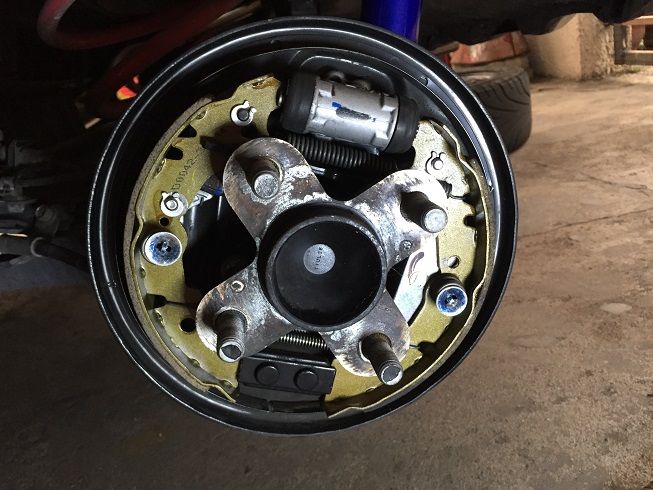
7. More pictures
8. More and more pictures
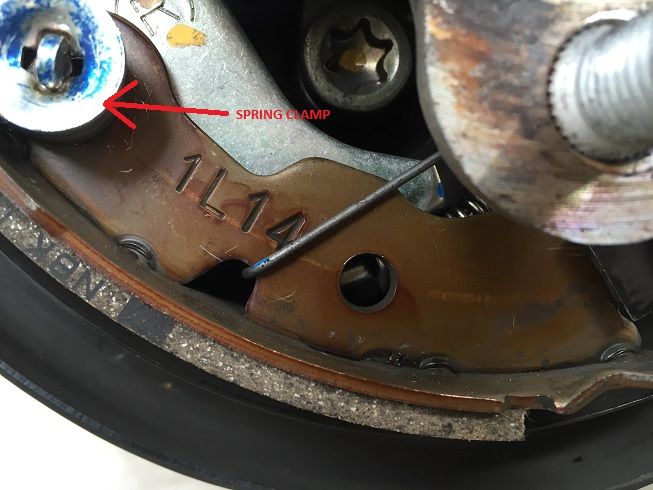
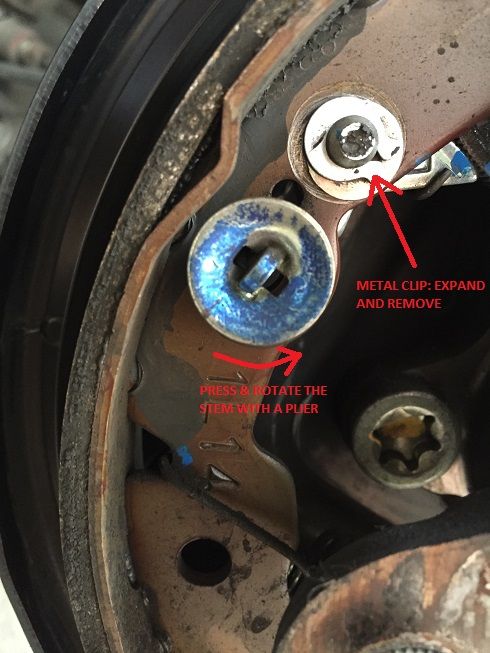
9. Now lets start dismantling em. We can start by removing the springs first or removing the spring clamp first. I removed the spring clamp first in this case. With a pliers, just push and clamp on the stem and turn. See the metal clip? It is one of the hardest thing to remove. Do it when we have the shoes out from the drum.
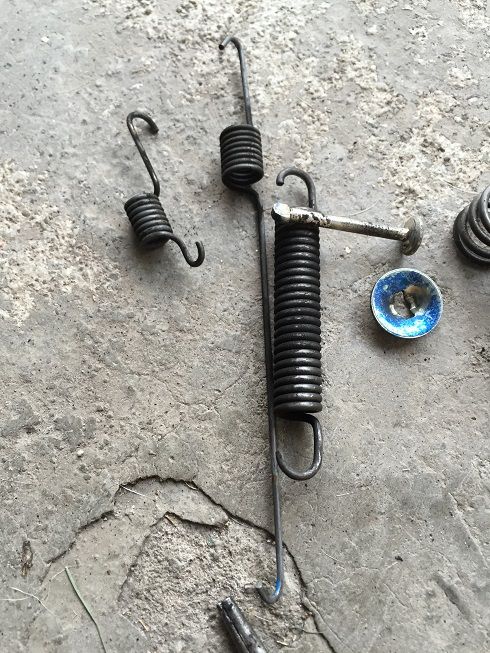
10. This is how the spring clamp looks like

11. Remove the springs as well...
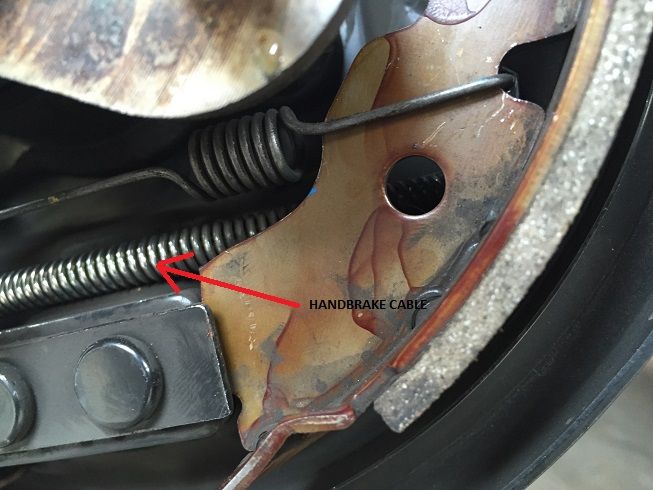
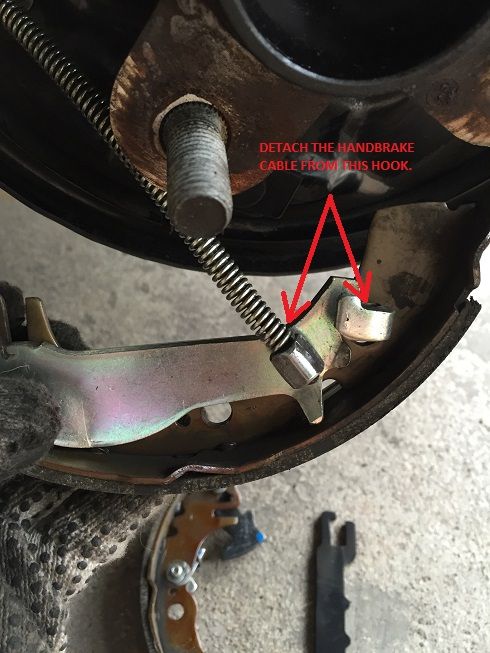
12. Next is removing the handbrake cable from the shoe hook. Slide the spring in and pull out the cable. FYI, the spring is freaking stiff.
13. Now transfer all the accessories to the new brake shoe and we are good to assemble it back. The accessories and secured onto the shoes with the metal clip I have shown earlier.
14. Put everything back in slow and nice. Remember to reset the adjuster!
Once everything was back on I tested the car slowly and carefully. First test the handbrakes, if the handbrakes is working that means the handbrake cables are correctly installed. Secondly is braking. I started with just releasing the clutch to go at slow speed and then brake, for a good 10 times. The only start driving at 20-30kmh and braked steadily and slowly. Then increase the speed to 60kmh and repeat the braking. So far so good Bear in mind that the brakes are still new and need to bed in. Do not attempt hard braking instantly after installing. Let it bed in first.
Hope you enjoy this post. And oh ya, fuck the mechanic. Noob!

I'm gonna post my DIY brake shoe change on my Myvi. Most of us know that brake shoes last very long, almost the lifespan of the car in some cases. Therefore we do not see many people changing the brake shoe. However, because myvi brakes suck, I thought of getting a better brand, at least at my perspective.
Story: This is my first DIY brake shoe change. I have done disc brake pad replacement which is fairly simple and easy but not brake shoe replacement. Thus before I started I actually went through some websites and videos to enrich my knowledge and courage (brakes man..screw up and I might die:stupid:). Although with some knowledge on how to do it, I still did not have the courage to do so. Therefore after having deeper thoughts, I decided to let the mechanic to do it (my friend, more than 10 years experience) and I watch and learn.
So I went to him and told him that I would like to change the brake shoes. He told me that it will take 1-2 hours at least. He then asked his junior to do it since he is already a senior and he continue to work on the car he was on. After around 40 minutes the junior managed to replace the old shoes with new one, with a lot of brute force. I shall tell you why later. Everything seemed perfect but when he wanted to put the cover back, it didnt fit. So after another 30 minutes he gave up and asked my friend to have a look. They both troubleshot the problem but was fruitless. Seeing them encountering trouble, I asked the junior if the adjuster is adjusted correctly or not and he answered yes, it is at the minimum expand setting. Since my friend had also looked at it so I trusted them and didnt question further. In the end my friend said that the new brake shoes are not identical and it cannot fit. They put back the original shoes and everything was fine. My mind wasnt thinking right at that time and I also thought that what he claimed is true so I paid him 20 bucks and left.
Feeling disappointed and dissatisfied, the question why the brake shoes didnt fit kept playing in my mind because I believe that the dissimilar between the original and the new shoe will not cause this problem. So I took the tools out and start DIY-ing !
1. This is the new brake shoe that I bought. Bendix Standard Bonded Brake Shoe.
2. The new brake shoe looks like this
3. Side by side comparison. Not much differences can be seen here.
4. You can see it clearly in this picture what is the difference. The bendix friction pad is actually longer (at both ends) than the original. This could result in more bite. AND THIS IS THE REASON THE MECHANIC GAVE ON WHY THE COVER CANT BE CLOSED!
5. So lets start the fun part! Jack up the car, put jack stand to support the car, and remove the wheels. After that just give the drum some soft knocks with a hammer and mallet. If you still cannot remove it, just put two screws at the screw hole and push the cover out.
6. Before we start on dissembling stuffs, lets take some pictures so that we will not forget how it should be assembled. In this picture we can see the adjuster. All drum brakes of any car brand have this. It is to self adjust when the pads get thinner.
7. More pictures
8. More and more pictures
9. Now lets start dismantling em. We can start by removing the springs first or removing the spring clamp first. I removed the spring clamp first in this case. With a pliers, just push and clamp on the stem and turn. See the metal clip? It is one of the hardest thing to remove. Do it when we have the shoes out from the drum.
10. This is how the spring clamp looks like
11. Remove the springs as well...
12. Next is removing the handbrake cable from the shoe hook. Slide the spring in and pull out the cable. FYI, the spring is freaking stiff.
13. Now transfer all the accessories to the new brake shoe and we are good to assemble it back. The accessories and secured onto the shoes with the metal clip I have shown earlier.
14. Put everything back in slow and nice. Remember to reset the adjuster!
Once everything was back on I tested the car slowly and carefully. First test the handbrakes, if the handbrakes is working that means the handbrake cables are correctly installed. Secondly is braking. I started with just releasing the clutch to go at slow speed and then brake, for a good 10 times. The only start driving at 20-30kmh and braked steadily and slowly. Then increase the speed to 60kmh and repeat the braking. So far so good
Bear in mind that the brakes are still new and need to bed in. Do not attempt hard braking instantly after installing. Let it bed in first. Hope you enjoy this post. And oh ya, fuck the mechanic. Noob!


