WIP: Time Attack Style NA AE86 Levin(75%completed)

  • See what others are reading now! Try Forums > Current Activity
  • Search function more powerful with google results! Try Search

zenlim

Known Member
Senior Member
Joined
Oct 30, 2006
Messages
289
Points
1,518


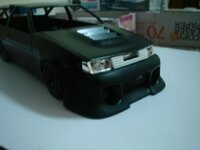
This is my 1st model i bulit..acctually i hv bulit two model b4 but i jz built by stick them up together n without paint so i consider this as my 1st model do u guy agree? hehe..

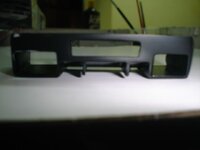
As i thot my project is goin to finish something bad happen...the front n rear bumper were crash by someone n i broke the ori bonnet hood too..So wad gonna do...I hv to scratchbuilt another rear n front bumper n bonnet hood...(Actually i do hv lot of progress pictures but my laptop hard disk broke down so all the Pictures were gone..)

+-..Commets were welcome..

Aftermarket part added:
Custom scratchbuilt front n rear bumper
Custom scratchbuilt front bonnet ala top secret style
custom scratchbuilt side skirt
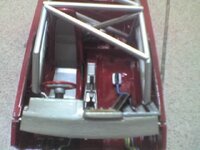
Custom time attack style centre console modified from ori centre console
Scratch built racing monitor
Scratch built Apexi neo turbo timer use to show engine condition
Scratch built meter gauges
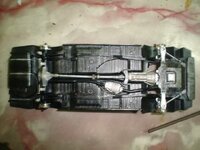
Scratch built front anti roll bar
scratch built air cool intake from straw
Scratch built rollcage
Scratch built fire extinguisher
Scratch built Engine Manegement (E-manage ultimate)
Scratch built Geee Teee Wing
Semi bucket seat taken from Fujimi Mrs kit
Added some wire to engine bay...
 
Last edited:
Scratchbuilt broken parts in progress...
">">

Use lot of epoxy putty n plaplate to built the front bumper...
 
Test fitting the front bumper..
 
Last edited:
Finish the front bumper..Hehehe..


Test fitting the front bumper again to make sure it fit nicely...


I found that the bumper fit nicely ..hehehe..
 
Last edited:
Since the front bumper is done so i carry on the bonnet hood..i hv lost those progress due reason i mention b4...
After finish the front bonnet hood next is the rear bumper..I try to make like those GT car rear bumper with diffuser...Hehehe..
 
Rear bumper finished...n test fitting the rear bumper to make sure its fit nice...
 
Here r the pict of the car without rear bumper..

Any comment will b welcome...
 
Finish the chasis..i try to do some weathering technique on the chasis..here are the pictures..
 
Spray the body to black color...after that sand with 1500 grift paper to make sure the boby is really smooth..
 
After i sand the body with sand paper i clear coat it and fit it with the chasis together...
 
Completed the interior...Here are the pictures of the scratch build rollcage,racing monitor,E-manage ultimate(Engine management) and fire extinguisher...

And also pictures of the custom time attack style light weighted centre console wit gauge meters n Apexi Neo turbo timer...stering were taken from fujimi evo VII kit...
 
Picture of the engine room before detailing...

Picture of the engine room after detailing...
 
Can see that lots of work & effort has been put into this kit from all the body kit modifications, interior detailing etc but it would be easier to appreciate all the hard work & fine details if the pics were sized, placed & a bit clearer lah.

Roll-cage's nice & interior's got lots of detailed parts added too. :)

Acc i took some of the pict using my handphone..i get my camera now so next updated will all taken using camera ..BTW my capturing technique is not so good...hehe..
 
Here couple pict of the engine..


I did some weathering technique to the exhaust manifold n engine block..
 
Last edited:
After clear coat the car i sand it off again wit 1500 grift paper den follow by 2000 n wax it up..here r the pict after wax n the shining car body..hehe..(All the pict below are taken after sanding and wax)

Pict of both side..


Pict of the roof..


Pict of the bonnet hood..


Pict of the front bumper...


Pict of the rear bumper...


Pict of car body,front and rear bumper and bonnet hood after sanding n wax..


Finally i finish my model....Really satisfy with all the effort that i hv given..will post more if i goin on my 2nd model...Thanks...
 
Last edited:
was the roll cage made up of the frame, that u thought of yrself?

it dos not look like it fits well in the car. the joints look very crudely glued together. Analyse carefully how a real roll cage looks like in magazines for track and rally cars.

to get a smooth bend heat the "frame" under candle and bend to shape. very tricky to get the exact same shpe for both sides. u can model the shape of roll cage u want wire wires the follw the shape to construct your roll cage.

yr pics are out of focus too. maybe too near to camera. get a shrp focus than crop put unwanted background.

ps. I am not regular scale model person, did build a few in long time ago.

if u heat and pull the frames fro you models can get very realsitic looking radio antenna. learned that while construction a model tank last time.

happy modelling.
 
Top Bottom