

How to improve braking performance (semi-DIY) part #1
The difference between life and death when in a vehicular emergency partially depends on how well your brakes work, paired with the condition of your tyres and the overall environment. Having had a near death life-flashing-before-my-eyes situation happen to me recently made me want to do something about my slushy brakes. I already am using super grippy nearly-semi-slick Yokohama AD07 tyres (and I suspect this was the only thing that saved my car from a serious accident) so the only thing I concluded that needed improving would be my brakes.
So here I am discussing on ways to improve your car brakes. I realise there many ways to go about it but I'm specifically going to focus on minimal modification methods, ie-brake bleeding, changing brake pads, changing to steel braided brake hoses, performance rotors and servicing your calipers.
As much as I get complimented for doing my DIYs, I still make mistakes. I have to thank Drexchan from EA Autoworks for being a great friend and helping me with this project which I'll be describing over 2 or 3 parts. Without his help I probably would have gotten myself into more trouble.

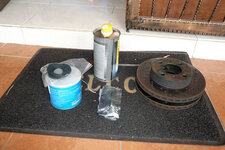
Things needed : DOT 4 Brake fluid, brake pads, cross drilled rotors, grease and tools. Caliper service kit is optional.
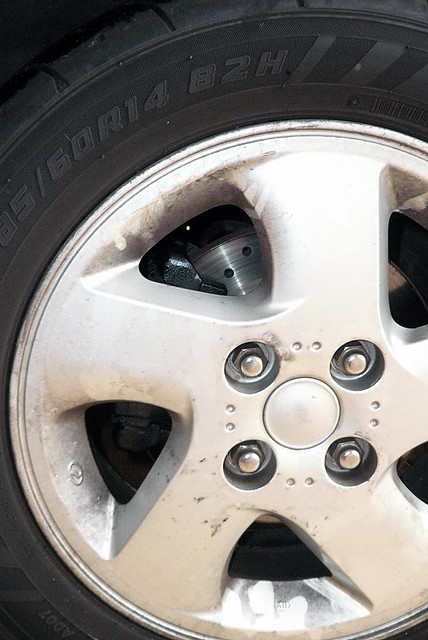
The first obvious thing is to loosen your wheel nuts and jack up the car.
It helps to clean the wheel well and all the bits and pieces there. I cleaned off the mud and baked dirt to lessen the chance of contaminating anything (or just basically to keep my finger nails clean).
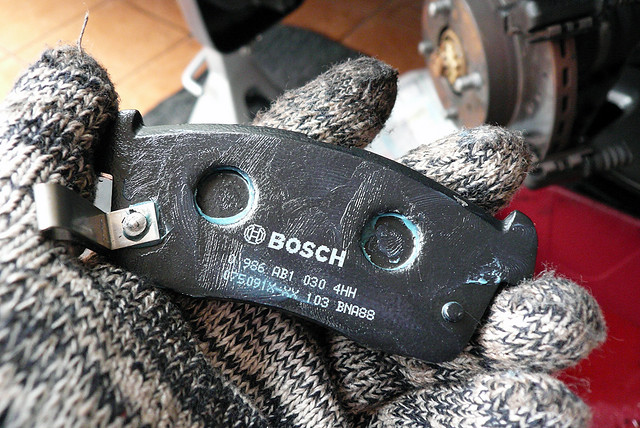
Loosen (do not take out!) the top size 14 bolt (this bolt size applies to Myvi. May differ for other cars) and remove the bottom size 14 bolt. Open up the caliper to reveal the brake pads. Remove the pads and the metal brackets holding them in place.
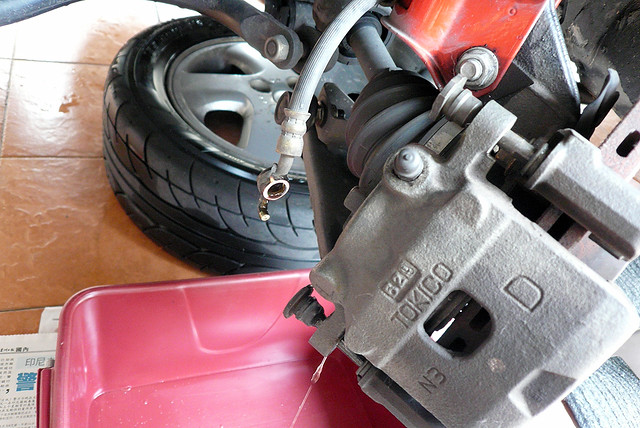
Look carefully at how the brake hose connects to the caliper. The hook on the hose fits snugly at a certain angle in a carefully placed hole on the caliper. The hoses have to be aligned back exactly the same position when re-installing. Don't lose the size 12 bolt holding it down!
Also, this will get messy as you'll be leaking brake fluid. So prepare the oil catcher box/thingy.
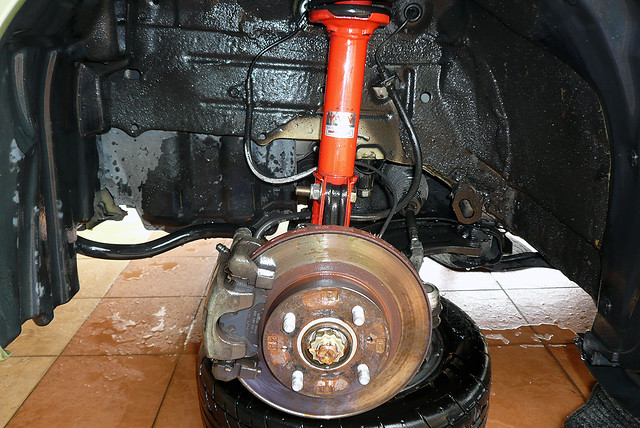
After that you can remove the top size 14 bolt and slide out the caliper and remove the caliper pins, brake pads and the metal brake pad brackets if you haven't already.
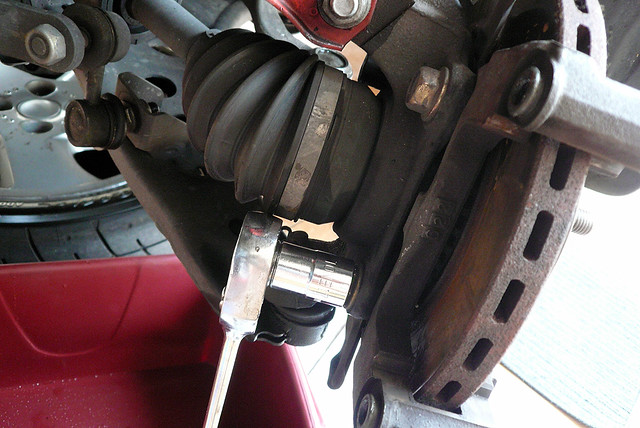
To remove the caliper bracket you'll need to remove 2 x size 17 bolts at the top and bottom.

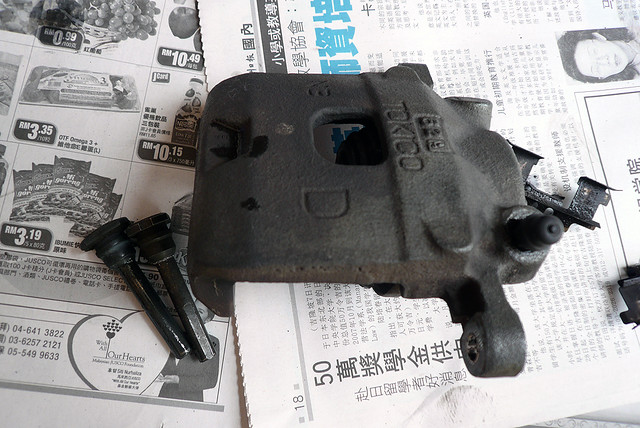
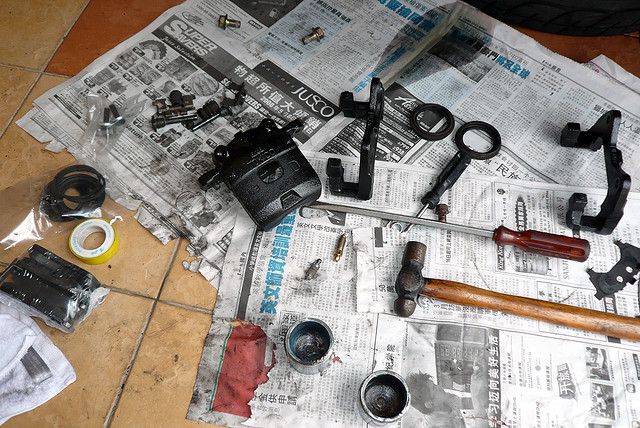
So now you should be able to easily remove the rotor. You'll have the caliper bracket, caliper, 1 x size 12 brake hose bolt, 2 brake pad shims, 2 x size 14 bolts, 2 x size 17 bolts, 2 x caliper pins, 2 brake pad holder clips, 2 x caliper pin rubber boots and the bleed nipple and cover should be snug in your caliper. You can use a size 10 opener to open the bleed nipple to separate it from the caliper.
This is for one side only. Do not lose anything!
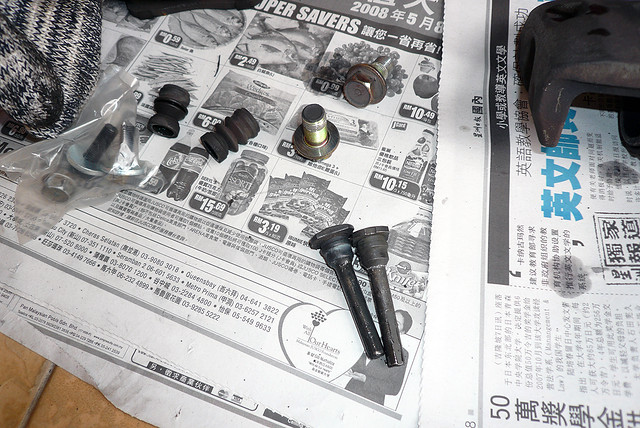
Inspect everything and replace whatever that doesn't look good. In my case I replaced all my caliper pins (since the old Myvi's were famous for having problems with this), replaced the size 14 bolts too because the head was starting to wear due to overtightening. I even replaced the bleed nipple because I destroyed one due to overtightening as well.
As a general guideline, the smaller the bolt, the less torque it needs to tighten it. So never overtighten otherwise you might spoil the bolt thread or head. I learnt the hard way.
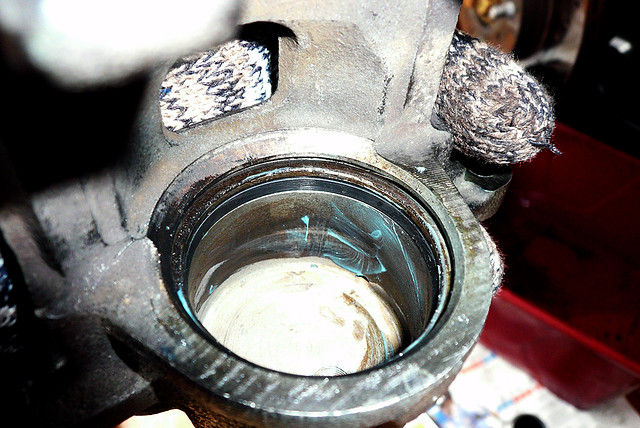
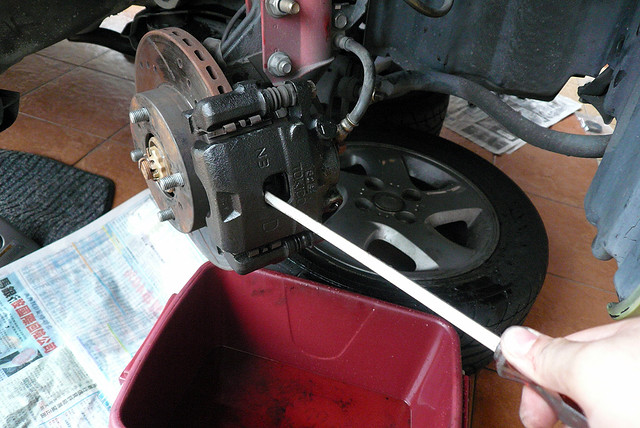
If you look at the bottom of the picture, you'll see two pistons. This had to be pumped out from the 2 calipers with a pretty strong airgun. You need to aim the airgun at the hole where the brake hose was connected to and compress the piston out. Use a cloth to cushion the piston when it pops out, it'll be very violent! Obviously I don't have a air compressor at home so I went to my local friendly tyre shop and borrowed their gear.
This step isn't completely necessary if the rubber bits on the piston is in good condition. Putting back the dust cover boot around the piston is a real pain in the you-know-where so do this only if you know how or if really necessary. I did it because I wanted to use the caliper service kit I bought.
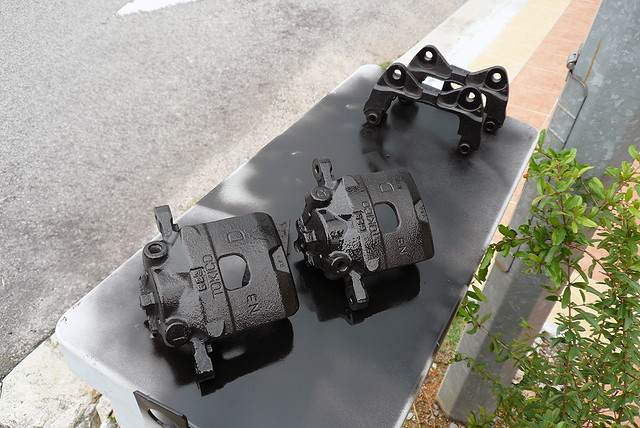
I know this doesn't do nuts for improving my brakes but hey, they were out. Might as well take the opportunity to spray them black! High temp black no less!
Take extreme caution to identify which is left and which is right. They are not the same!!
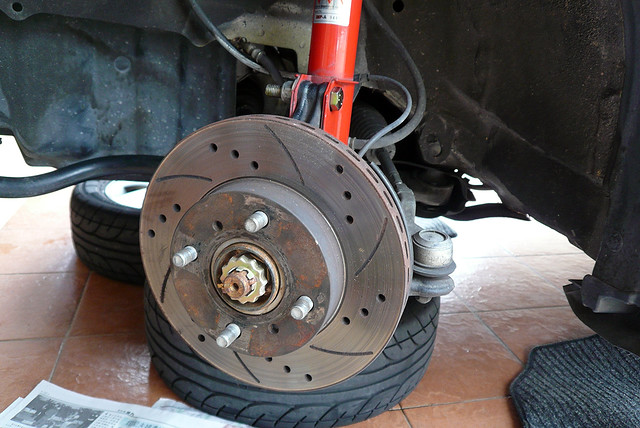
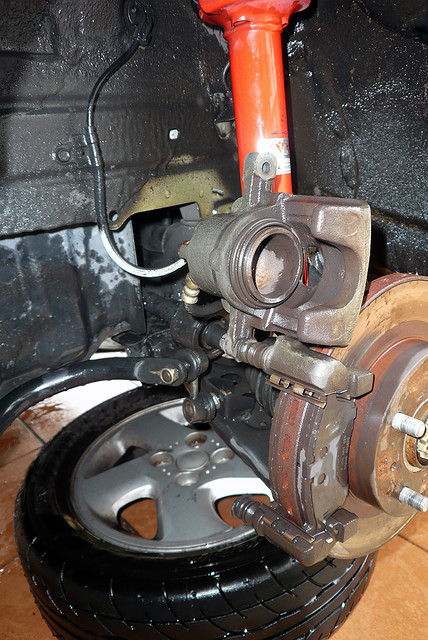
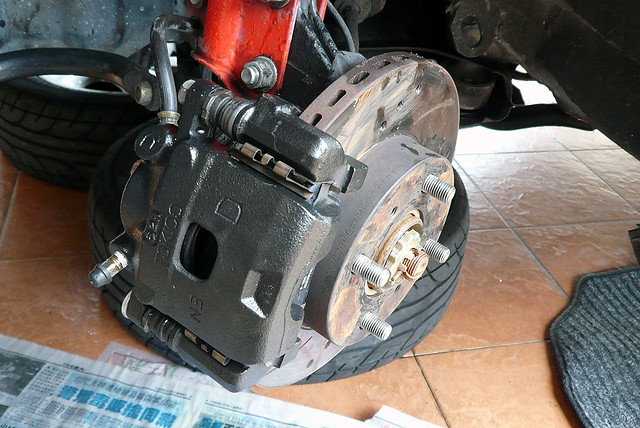
I had some old cross drilled, slotted and ventilated rotors lying around so I thought it'd be good to use them again. Performance rotors like these don't improve your braking, what it does is improve braking efficiency. To understand what that means you have to understand what the slots and drills are for.
The cross drilled sections allow for gas to escape to lessen the chances of brake fade when under heavy braking. I'm not quite sure how the gas is produced but a quick Google will help you answer that. The slotted sections skim even layers off your brake pad to ensure a clean layer of the brake pad is in contact with the rotor. Essentially performance rotors help reduce brake fade. Bewarned though, more holes or slots doesn't mean it's better. It also means the brake pads have less surface contact with the rotor which means it takes more effort to brake so don't go drilling your OEM rotors just because you want to!
(And yes.. I know the wrong side rotor is installed in this picture)
As mentioned earlier, putting the rubber bits back with the piston into the caliper is really difficult. It took me an hour plus to fit it in! I used some brake oil to slide the piston in and some high temp grease on the inside to stop or prevent rusting.
Note : Be careful when using the brake oil. Brake oil will dissolve all the spray painting you did earlier!
This isn't absolutely necessary but I put some high temp grease before putting the shims back on the pad to be installed back into the caliper.
At this point you should be able to reinstall the bracket, caliper pins, caliper, brake hose and the metal brackets holding the brake pads. Essentially reinstall everything you dismantled earlier in reverse order.
What I'm doing here is compressing the piston back inside using the inner side brake pad, the rotor and some leverage. I installed the inner brakepad, closed the caliper, positioned my flat screw driver in such a way I could lever it to push the pad which'll in turn push the piston back into the caliper.
Ideally you should use a brake piston compressor or whatever it's called. It's easier and safer to use but since I don't have it, this 'bawah pokok' mechanic method will do.
Finish up by installing both brake pads (inside and out) with the shims and all.
And there you have it folks. A completely serviced brake caliper with new pads.
Now, if you have keen eyes, you'll notice the bleed nipple is facing downwards in this picture. That's because I had the wrong caliper installed. I switched the left and right calipers and that's a big no-no! Thanks goes to Drexchan for realising this and fixing the problem for me!
To be continued : How to bleed your brakes.
Btw, for those interested in changing pads, you can skip the parts where you have to remove the calipers and just focus on removing and reinstalling the pads. But read part #2 for more info.
The difference between life and death when in a vehicular emergency partially depends on how well your brakes work, paired with the condition of your tyres and the overall environment. Having had a near death life-flashing-before-my-eyes situation happen to me recently made me want to do something about my slushy brakes. I already am using super grippy nearly-semi-slick Yokohama AD07 tyres (and I suspect this was the only thing that saved my car from a serious accident) so the only thing I concluded that needed improving would be my brakes.
So here I am discussing on ways to improve your car brakes. I realise there many ways to go about it but I'm specifically going to focus on minimal modification methods, ie-brake bleeding, changing brake pads, changing to steel braided brake hoses, performance rotors and servicing your calipers.
As much as I get complimented for doing my DIYs, I still make mistakes. I have to thank Drexchan from EA Autoworks for being a great friend and helping me with this project which I'll be describing over 2 or 3 parts. Without his help I probably would have gotten myself into more trouble.
Things needed : DOT 4 Brake fluid, brake pads, cross drilled rotors, grease and tools. Caliper service kit is optional.
The first obvious thing is to loosen your wheel nuts and jack up the car.
It helps to clean the wheel well and all the bits and pieces there. I cleaned off the mud and baked dirt to lessen the chance of contaminating anything (or just basically to keep my finger nails clean).
Loosen (do not take out!) the top size 14 bolt (this bolt size applies to Myvi. May differ for other cars) and remove the bottom size 14 bolt. Open up the caliper to reveal the brake pads. Remove the pads and the metal brackets holding them in place.
Look carefully at how the brake hose connects to the caliper. The hook on the hose fits snugly at a certain angle in a carefully placed hole on the caliper. The hoses have to be aligned back exactly the same position when re-installing. Don't lose the size 12 bolt holding it down!
Also, this will get messy as you'll be leaking brake fluid. So prepare the oil catcher box/thingy.
After that you can remove the top size 14 bolt and slide out the caliper and remove the caliper pins, brake pads and the metal brake pad brackets if you haven't already.
To remove the caliper bracket you'll need to remove 2 x size 17 bolts at the top and bottom.
So now you should be able to easily remove the rotor. You'll have the caliper bracket, caliper, 1 x size 12 brake hose bolt, 2 brake pad shims, 2 x size 14 bolts, 2 x size 17 bolts, 2 x caliper pins, 2 brake pad holder clips, 2 x caliper pin rubber boots and the bleed nipple and cover should be snug in your caliper. You can use a size 10 opener to open the bleed nipple to separate it from the caliper.
This is for one side only. Do not lose anything!
Inspect everything and replace whatever that doesn't look good. In my case I replaced all my caliper pins (since the old Myvi's were famous for having problems with this), replaced the size 14 bolts too because the head was starting to wear due to overtightening. I even replaced the bleed nipple because I destroyed one due to overtightening as well.
As a general guideline, the smaller the bolt, the less torque it needs to tighten it. So never overtighten otherwise you might spoil the bolt thread or head. I learnt the hard way.
If you look at the bottom of the picture, you'll see two pistons. This had to be pumped out from the 2 calipers with a pretty strong airgun. You need to aim the airgun at the hole where the brake hose was connected to and compress the piston out. Use a cloth to cushion the piston when it pops out, it'll be very violent! Obviously I don't have a air compressor at home so I went to my local friendly tyre shop and borrowed their gear.
This step isn't completely necessary if the rubber bits on the piston is in good condition. Putting back the dust cover boot around the piston is a real pain in the you-know-where so do this only if you know how or if really necessary. I did it because I wanted to use the caliper service kit I bought.
I know this doesn't do nuts for improving my brakes but hey, they were out. Might as well take the opportunity to spray them black! High temp black no less!
Take extreme caution to identify which is left and which is right. They are not the same!!
I had some old cross drilled, slotted and ventilated rotors lying around so I thought it'd be good to use them again. Performance rotors like these don't improve your braking, what it does is improve braking efficiency. To understand what that means you have to understand what the slots and drills are for.
The cross drilled sections allow for gas to escape to lessen the chances of brake fade when under heavy braking. I'm not quite sure how the gas is produced but a quick Google will help you answer that. The slotted sections skim even layers off your brake pad to ensure a clean layer of the brake pad is in contact with the rotor. Essentially performance rotors help reduce brake fade. Bewarned though, more holes or slots doesn't mean it's better. It also means the brake pads have less surface contact with the rotor which means it takes more effort to brake so don't go drilling your OEM rotors just because you want to!
(And yes.. I know the wrong side rotor is installed in this picture)
As mentioned earlier, putting the rubber bits back with the piston into the caliper is really difficult. It took me an hour plus to fit it in! I used some brake oil to slide the piston in and some high temp grease on the inside to stop or prevent rusting.
Note : Be careful when using the brake oil. Brake oil will dissolve all the spray painting you did earlier!
This isn't absolutely necessary but I put some high temp grease before putting the shims back on the pad to be installed back into the caliper.
At this point you should be able to reinstall the bracket, caliper pins, caliper, brake hose and the metal brackets holding the brake pads. Essentially reinstall everything you dismantled earlier in reverse order.
What I'm doing here is compressing the piston back inside using the inner side brake pad, the rotor and some leverage. I installed the inner brakepad, closed the caliper, positioned my flat screw driver in such a way I could lever it to push the pad which'll in turn push the piston back into the caliper.
Ideally you should use a brake piston compressor or whatever it's called. It's easier and safer to use but since I don't have it, this 'bawah pokok' mechanic method will do.
Finish up by installing both brake pads (inside and out) with the shims and all.
And there you have it folks. A completely serviced brake caliper with new pads.
Now, if you have keen eyes, you'll notice the bleed nipple is facing downwards in this picture. That's because I had the wrong caliper installed. I switched the left and right calipers and that's a big no-no! Thanks goes to Drexchan for realising this and fixing the problem for me!
To be continued : How to bleed your brakes.
Btw, for those interested in changing pads, you can skip the parts where you have to remove the calipers and just focus on removing and reinstalling the pads. But read part #2 for more info.
Attachments
-
 212.1 KB Views: 1,374
Last edited: