

VW Beetle Custom & Performance
- Thread starter vwmania
- Start date


tips about progresive webber carb
To help make the right choice for your future needs
In the past there have been questions and much miss information put out on the choice of a 32/36 DGEV carb or the 38 DGAS
1) The Kits utilizing the 32/36 Progressives Weber are designed to provide the market with an economical performance carburetor conversion that while increasing Hp also improves drivability and fuel economy over the stock carburetor. The kits using the 32/36 progressive carburetor is the optimum carburetor for use as a replacement carburetor for a worn out or hard to maintain factory carb.
2) When purchased in kit form, the Redline Weber kit with the 38mm DGAS carb will perform on a stock unmodified engine without any problems. This is not going to be an over carburetion situation.
It will provide considerably more initial torque and acceleration but the top end performance will not be significantly improved over the 32/36 when used on a stock motor.
3) The 38mm DGAS carb should be the only consideration if the engine is in the future or currently going to have any level of additional engine modification. Such as headers, free flowing exhaust, a cam, or rebuilt engine. Usually these motors will be improved over stock with oversize pistons and towing cam. The 38 will enhance the improvements of any of these items. The 6 cylinder engine applications are particularly enhanced by this application. In-fact on ALL JEEP and LAND CRUSER applications with any upgrades this is a mandatory choice. Other wise the progressive will require extensive re-calibration to work properly.
4) When using a 32/36 in the above situations will require additional calibration and rejetting to attain the desired performance and standard fuel economy. There is a jet kit available for just this reason. The jetting is required due to the performance enhancements of the additional modifications. Although the 32/36 does out perform the original, to receive the full benefit of your investment the 32/36 will require helpful re-calibration. The 38 DGAS is the optimum choice and has a larger fuel delivery system and the calibration to handle the broader range of improved performance and improves substantially your other product investments.
5) While the 32/36 progressive carb will improve your fuel economy on a stock motor over the OEM carb. The 38 Synchronous carb will not get less fuel economy than the OEM carb.
RECAP
The 32/36 DGV progressive carburetor as used in any Redline Weber kit is pre-calibrated and set to run on most normal standard and stock engines and provide a performance and fuel economy improvement. If that engine has been upgraded or improved with other performance items there will be a need to recalibrate or rejet the carburetor in some situations. There is a performance jet kit just for the Jeep applications Pt No. 701-DGV.
The 38 DGAS synchronous carburetor when supplied in kit form from Redline Weber is also pre-calibrated for use on stock or slightly modified motors and will not be over carbureted. It also provides the best starting point for engines that are ultimately going to be upgraded with additional performance Items with performance over fuel economy being the ultimate goal.
Tech Tips
Tech Tip #1 Improve your 1st/2nd Shift Fork Adjustment
If you are not getting good results during your shift fork adjustments, here are some things to consider. In approximately 1966 Volkswagen started producing 1-2 sliders which were 25mm wide instead of the previous 26mm type. They also added .50mm more space on either side of the center detent depression on the 1-2 shift rails, thus producing 1mm greater travel. This made up for the 1 mm less sleeve thickness and resulted in more shifter throw and a more positive shift. This updated shift rail can be identified by a large groove on the hockey stick end of the rail. The first 25mm wide sleeves found in US production can be identified by a single groove down the center of the reverse teeth (mid 66). From 67-71 the sliders will have 2 grooves on the tips of the reverse teeth and continue to be 25 mm wide. The 1-2 shift rails with the correct detent layout for 25mm sliders are available from Long Enterprises. Order part# 113 311 557B.
Tech Tip #2 Synchros: 110° vs 120° Face Angles
Question: "What is the difference between synchros with the 3 notches on the side (i.e. 113 311 269B and 113 311 295D) and the ones without (i.e. 113 311 269A and 113 311 295A)?
Answer: The short answer is the 113 311 269B and 113 311 295D synchros with three notches on the sides have 120° face angles and the 113 311 269A and 113 311 295A (no notches) have 110° face angles.
Let me explain... The 113 311 269B and 113 311 295D have synchronizer teeth with 120° degree face angles. When these synchros were first introduced the face angles on the engagement teeth of the sliders were also changed to 120°. The additional 10° more gradual angle provided improved shifting. The first 1-2 slider with 120° face angles on the 2nd gear side engagement teeth was introduced in late 1971. This 1-2 slider can be identified by an annular groove on the shoulder next to the shift fork slot and by 2 small grooves on the tips of the reverse teeth. It has 120° angles on the 2nd gear side only and therefore requires a 113 311 269B (120°) on 2nd gear and a 113 311 269A (110°) on 1st gear. The 113 311 255C 1-2 slider (1972-75, 5mm wide shift fork style), requires this same synchro arrangement with a 113 311 269A on 1st and a 113 311 269B on 2nd gear.
The first 3-4 slider with 120° face angles on the engagement teeth was introduced at the same time (late 1971) and can be identified by two annular grooves, one on either side of the shift fork slot. This 3-4 slider requires a 113 311 295D synchro (120°) on both 3rd and 4th gears. The 002 311 315 3-4 slider (72-75, 5mm wide shift fork slot style) uses the 113 311 295D synchro on 3rd and 4th also. If this all seems a bit confusing consider ordering one of our Rebuild Kits where the correct synchros are already included.
One word of caution, for those of you who like to use used synchros over again....if you happen to put a 113 311 269 (narrow shift plate or "key" slots, 1st gear only in early 002 buses) on 2nd, the gear box will grind so bad it'll make you think you didn't put a synchro in at all!
Tech Tip #3 Gear Ratio Formula:
To calculate mph in any
gear here is the formula: RPM X 1/2 TIRE HEIGHT = MPH
GEAR RATIO X RING & PINION X 168
Tech Tip #4 Do I have early or late synchros?
Question: How can I tell if I have early or late synchros in my swing axle trans?
Answer: If you have early synchros your 1st gear synchro will only fit on 1st. If that is the case, then 2nd, 3rd, and 4th gear synchros are all the same. If you have late synchros then your 1st gear synchro, will fit on 2nd gear and visa-versa. If that is the case then 3rd & 4th gear synchros are the same.
EARLY swing-axle trans (pre-1966)
113 311 247A 1st gear synchro only, (smaller ID)
113 311 295A 2nd, 3rd and 4th gear synchro
LATE swing axle trans (1966-1968)
113 311 269A 1st & 2nd gear synchro
113 311 295A 3rd & 4th gear synchro
Note: Early first gears (61-63) with 11.75 mm wide gear teeth should not be used in any kind of performance application. Try to use 1st gears with 13.5 mm wide gear teeth and corresponding wider 1st gear on the mainshaft. The later gears (66-on) also have wider thrust surfaces on the ends which contact the 1st/2nd clutch gear and are less prone to galling and failure. If you would like to upgrade to these later style gears contact us and we can tell you what you need.
Tech Tip #5 Upgrade your leaky shift housing (nose cone)
If your transaxle is fitted with a 1966 or earlier shift housing chances are you've experienced oil leaking from the area where the shift lever (hockey stick) exits the front of the housing. Until now there hasn't been any way to install an oil seal in the early housings as the outer internal bushing is located all the way at the end thus leaving no room for the type of bushing that carries a seal. We now have an extremely high quality bushing that replaces the old split bushing at the outer end and carries a seal! Order part # 001 301 209A
Also as long as you've got the shift housing off it's a good idea to perform a simple factory modification. What's involved is removing a little bit of metal from the baffle in front of the channel leading to the vent hole (in later housings you can see that this area is opened up considerably). This can be done by cutting a small (approx 1/2 inch) V shaped notch in the baffle thereby avoiding a pressure build-up that cause an even a bigger oil leak out the vent hole!
Tech Tip #6 Prevent spinning drive hubs
For stock transaxle rebuilds we recommend you press off 3rd and 4th drive hubs and check for any signs of spinning. If evidence of spinning is found both the gear and the drive hub will need to be replaced. If they look good and the engagement teeth are in good shape, green locktite before reinstalling (see LE 180 VW Transaxle Rebuilders Course CD for information on tooth geometry and other details on this procedure). For performance or off road use, Long Enterprises can Tig weld your drive hubs for you. We then put the gear on a precision industrial honing machine to insure the bore is correct. Order LE 108 for new or excellent used replacement drive hubs.
how to tune ur weber progresive carb...source by redline weber
Carburetor Set Up and Lean Best Idle Adjustment
Base line Settings
Speed Screw 1 to 11/2 turns
Mixture Screw 2 turns
Your settings with engine running
Speed Screw______________
Mixture Screw______________
It is important to follow all linkage and lever installation instructions. The number one and two reasons for tuning errors are improper linkage installations and over tightened linkage nut, causing a binding in linkage assembly.
CALIBRATIONS MAY VARY DUE TO REGIONAL FUELS AND STATE OF ENGINE TUNE AND PERFORMANCE. POOR RUNNING QUALITY DOES NOT MEAN A DEFECT IN THE CARBURETOR. AN ADVANTAGE OF THE WEBER CARBURETOR IS ITS EASE OF ADJUSTMENT AND TUNING.
SET UP ADJUSTMENTS
Start set up by confirming carb base line settings. Do not depend on the factory delivered settings. Check them before the carb is installed.
All settings are done with choke disengaged or warmed up so that the choke is fully opened and disengaged. This is done on automatic choke carburetors by first opening the choke butterfly by hand and inserting a wood block or wedge of some kind to hold open while the linkage is cycled (linkage operated through its full movement ) to clear the choke cam. (You will hear a metallic click as the cam is released. You can check the fast Idle screw under the choke assembly to confirm that it is not in contact with the choke fast idle cam.)
Set the Idle stop screw (speed screw see fig 1) by backing out the Idle speed screw until it is not in contact with the throttle stop lever. Cycle the linkage again to be sure that the linkage comes to close without any assistance. (Checking for linkage bind) Now bring screw back into contact with the lever and continue to open or screwing in 1 turn no more than 11/2 turns.
Set the mixture screw (see Fig 1) by first screwing in until the screw stops, bottoms out. DO NOT FORCE OR BIND AS THIS WILL CAUSE DAMAGE TO THE SCREW AND IT’S SEAT IN THE BODY OF CARBURETOR. Back out the screw 2 full turns.
TUNING
1. BE SURE TO FOLLOW THE NEXT INSTRUCTIONS IN THE PROPER SEQUENCE, DEVIATION WILL CAUSE THE CARBURETOR TO NOT FUNCTION TO ITS IDEAL SPECIFICATIONS AND MAY NOT PROVIDE THE PERFORMANCE AND FUEL ECONOMY AS DESIGNED.
2. Start the engine, the engine will run very slowly more like a tractor. As long as the engine stays running idle speed is not important at this point.
3. The first thing to do is not set up the idle speed, but to set the Idle mixture screw to lean best idle setting. First, turn in the mixture screw until the engine dies or runs worse, then back out the screw (recommend turning ¼ to ½ turn at a time). The engine should pick up speed and begin to smooth out. Back out ½ turn more, or until the screw does nothing or runs worse then turn back to the point where it ran its best.
4. Use your ear, not a scope or tuning instruments at this point. You want to tune the engine by sound. Adjust to best, fastest and smoothest running point.
5. Now that the mixture screw is at its best running location, you can adjust the Idle speed the screw. The screw will be sensitive and should only take ¼ to ½ turns to achieve the idle speed you like.
6. Check and set idle to your driving preference. Put the car in gear and apply slight load, (AC on) and set the Idle as you like it. Don’t set it too high, as this will cause causes excessive clutch and brake wear. The Idle only needs to be 7 to 900 RPM with light load or AC on.
7. Recheck timing and vacuum hook ups. Recheck mixture screw to lean best idle again. If all is still best and smoothest idle then confirm and note the final settings.
8. To confirm settings with the engine running. Start by screwing in the mixture screw and count the number of turns it takes to bottom out and note if the engine dies. If Idle Mixture screws are with in ½ turn of base line setting then all is well and have fun. Also check the speed screw and note how many total turns from initial contact. You may have opened (turned in) the speed screw. Your final setting should be under 2 full turns. Reset the screws (back in) to the best final settings (Per your notes) and go on a test drive and have fun. If the settings are other than described then you may want to recalibrate the Idle circuit (low speed circuit) to your engines needs. This is done by following the rule of thumb BELOW.
Simple Rules for low speed calibration
If the mixture screw is more than 2 1/2 turns out turns then the Idle jet is too lean (too Small). When the mixture screw is less than 11/2 then the Idle jet is too rich (too large). These assumptions are based on the fact that the speed screw setting is not opened more than 11/2 turns. If the speed screw has to be opened 2 or more turns then this is also an indication of a lean condition usually requiring greater change. At times it may appear to be showing signs of richness or flooding it is really a lean condition. See pictures and notes in the tech 2 article supplied in the kit instructions, view and please understand the need to keep throttle plate as near to closed as possible so as not to prematurely expose the transition holes. This is what causes the visible rich condition, and confirms the need to increase the jet size. JET KITS are available if needed.
EXAMPLE With the speed screw set at no more than (1 1/2) turns in after contact with the stop lever; and the best idle occurring with the mixture screw set at 3 turns from bottom, indicates the need for a larger Idle jet. Achieving the best idle at under 2 turns indicates the need for a smaller idle jet.
The secret to understanding the critical nature of the carburetor set up and the advantages of a WEBER over other carburetors is the Idle circuit. Referred to as the low speed circuit by Weber, this circuit is responsible for 80% of the driving operation. This is the reason that the Weber should give a fuel economy improvement over most factory carbs along with significant performance gains. In the worst case you should not see a significant fuel economy loss over stock, while improving HP & Drivability.
The Weber Carburetor is a sequentially timed device to the motor like the distributor. Time taken in the setup will provide more fun later.
If you should need to call REDLINE WEBER for technical assistance we will need to know your final settings to help. Technical assistance is free for the first 60 days of purchase. Units in service over 60 days may be assessed a service fee. All charges will be noted up front after a brief consultation to determine any possible defect. If the carb is out of the warranty period and no defect is determined we will estimate the possible cost of tech support or recommend literature available that may help.
ALL WARRANTIES ARE HANDLED DIRECTLY THROUGH REDLINE WEBER NOT THE RETAILER. DO NOT SEND PARTS TO MANUFACTURER WITHOUT CALLING FOR TUNING CONSULTATION AND WARRANTY CONFIRMATION OR INSPECTION RETURN AUTHORIZATION. PARTS RETURNED WITHOUT AUTHORIZATION NUMBERS WILL BE REFUSED AND RETURNED FREIGHT COLLECT.
PARTS RETURNED FOR INSPECTION AND WARRANTY CONSIDERATION AND NOT FOUND TO BE DEFECTIVE WILL BE CHARGED A MINIMUM INSPECTION AND ADJUSTMENT CHARGE OF $35.00 AND RETURNED FREIGHT COLLECT.
Contact REDLINE WEBER at 1 800 733 2277 ex 7457 Monday thru Friday 8:00 to 5:00 Pacific Standard Time
Non warranty Tech support is on a fee for services basis with minimum charge of 35.00 per problem resolution . With tech support calibration and tuning parts will be available at discount pricing as well as access to technical support documents and mailings
REDLINE WEBER
19630 Pacific Gateway Dr. Torrance, CA 90502
800-733-2277 Press Option 3
REDLINE is a division of WORLDPAC
The REDLINE WEBER Difference
www.REDLINEWEBER.com e-mail [email protected]
Home
ive got no weber progresive rite now encik masin.....but i have set of twin weber 34ICT in good condition....asking bout rm 750 nego sumore....
hello sifu..
just want some opinion..recently i ve found that my bug pulled to the left when braking..after some checking and research on the net (http://www.superbeetles.com), i guess that there's a clog
on the right front brake hose..
what's the best thing i can do..does bleeding is enough? if not, how to unclog it..since my brake hose still use the steel type, can it be changed with the normal rubber type hose?
hi josumi...i have no idea where u gone to sale that car...
seem like u advert at motor trader....that my opinion.....
seem like u advert at motor trader....that my opinion.....
The Marketplace Latest
-
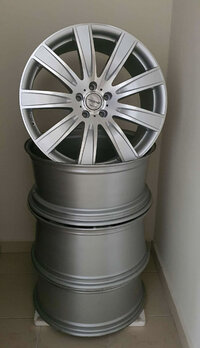
20 rim with 2 tyre
- Started by astonmoo
- Chassis and Wheels
-
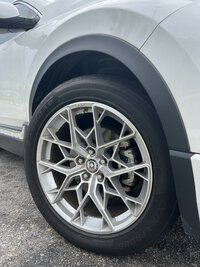
19 rim with 235/55/19 tyre
- Started by astonmoo
- Chassis and Wheels
Recent Posts
Random Post Every 5 Minutes
guys, im plannin to install one of them.. wat brand do u guys recommend? cusco, greddy, arospeed, etc? its actually the same isnt it?
i was told it will kinda 'preserve' the throttle? noobie here, so i was wonderin if throttle can be cleaned, if not it would be defeatin the purpose of installin one of them since the throttle has already dirty rite?
correct me if im wrong
i was told it will kinda 'preserve' the throttle? noobie here, so i was wonderin if throttle can be cleaned, if not it would be defeatin the purpose of installin one of them since the throttle has already dirty rite?
correct me if im wrong
Ask a question, start a discussion or post something for sale!
Post thread
Enjoying Zerotohundred?
Log-in for an ad-less experience